


braided line uni knot,Braided Line Uni Knot: A Comprehensive Guide

Braided Line Uni Knot: A Comprehensive Guide
Have you ever wondered about the intricacies of the braided line uni knot? This versatile and reliable knot is a staple in the fishing community, offering a secure connection between your line and lure. In this detailed guide, we will delve into the various aspects of the braided line uni knot, including its history, benefits, and step-by-step instructions.
History of the Braided Line Uni Knot

The uni knot, also known as the improved clinch knot, has been around for over a century. It was first introduced in the early 20th century by angler and inventor, John D. Willcox. The knot gained popularity due to its simplicity and effectiveness in securing braided lines. Over time, it has become a go-to knot for anglers worldwide.
Benefits of the Braided Line Uni Knot
There are several reasons why the braided line uni knot is preferred by many anglers:
-
Strength: The uni knot is known for its exceptional strength, making it suitable for a wide range of fishing applications.
-
Reliability: The knot is highly reliable, providing a secure connection between your line and lure, even in challenging conditions.
-
Simple to Tie: The uni knot is relatively easy to tie, making it accessible to anglers of all skill levels.
-
Adjustable: The knot can be easily adjusted to achieve the desired tension, ensuring a snug fit.
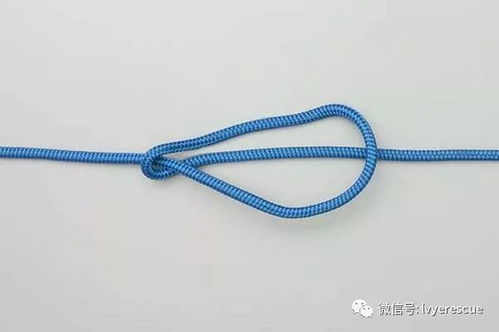
Step-by-Step Instructions for Tying the Braided Line Uni Knot

Now that we understand the benefits of the braided line uni knot, let’s learn how to tie it:
-
Start by making a loop in your braided line, about 6-8 inches from the end.
-
Pass the end of the line through the loop, creating a second loop.
-
Take the end of the line and pass it through the first loop, from the back to the front.
-
Now, take the end of the line and pass it through the second loop, from the back to the front.
-
Make a half-hitch by passing the end of the line around the standing part of the line, from the front to the back.
-
Pass the end of the line through the loop created by the half-hitch.
-
Moisten the knot with saliva or water to help it set.
-
Twist the knot clockwise to tighten it, then pull on the standing part of the line to secure the knot.
Table: Comparison of Braided Line Uni Knot with Other Knots
| Knot | Strength | Reliability | Ease of Tying |
|---|---|---|---|
| Braided Line Uni Knot | High | High | Medium |
| Improved Clinch Knot | High | High | Easy |
| Palomar Knot | Medium | High | Easy |
| Albright Knot | High | High | Medium |
As you can see from the table, the braided line uni knot offers a good balance between strength, reliability, and ease of tying. It is a versatile knot that can be used in various fishing scenarios.
Common Mistakes to Avoid When Tying the Braided Line Uni Knot
While the braided line uni knot is relatively straightforward, there are a few common mistakes to avoid:
-
Not making a large enough loop: Ensure that the loop is 6-8 inches


