


mq uni map,Understanding the mq uni map: A Comprehensive Guide

Understanding the mq uni map: A Comprehensive Guide

When it comes to integrating maps into your uni-app projects, the mq uni map is a powerful tool that offers a wide range of functionalities. Whether you’re looking to display a simple map, add markers, or even implement advanced features like clustering and polygon creation, the mq uni map has got you covered. Let’s dive into the details and explore how you can leverage this feature to enhance your applications.
Creating a Map Context
Before you can start adding markers or manipulating the map, you need to create a map context. This is done using the `uni.createMapContext` method, which takes the map’s ID and the current page instance as arguments. Here’s an example of how you can create a map context:
const mapContext = uni.createMapContext('map', this);Once you have the map context, you can use it to perform various operations on the map, such as adding markers, moving the map, and more.
Adding Markers
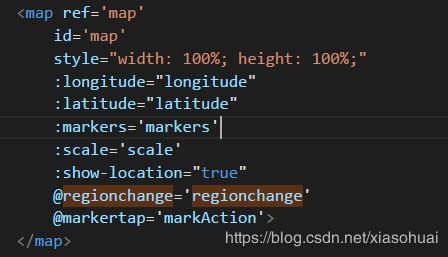
One of the most common uses of the mq uni map is adding markers to the map. There are two ways to do this: directly using the `markers` attribute or using the map context to control the markers.
Using the markers attribute
Directly using the `markers` attribute is the simplest way to add markers to the map. You need to define an array of marker objects in your data function and then assign it to the `markers` attribute of the map component. Here’s an example:
data() { return { markers: [ { id: 123, latitude: 39.90469, longitude: 116.40717, width: 20, height: 20, iconPath: '../../static/menu/recommend.png' } ] };}In this example, we have added a single marker to the map. You can add as many markers as you need by adding more objects to the `markers` array.
Using the map context
Using the map context to add markers gives you more control over the markers. You can use the `addMarkers` method to add markers to the map. Here’s an example:
mapContext.addMarkers({ markers: [ { id: 123, latitude: 39.90469, longitude: 116.40717, width: 20, height: 20, iconPath: '../../static/menu/recommend.png' } ]});This method allows you to add multiple markers at once and provides more options for customizing the markers, such as setting the icon path, width, and height.
Marker Click Events
Marker click events are a great way to provide interactive experiences for your users. You can define a click event handler for each marker and execute custom code when the marker is clicked. Here’s an example of how you can add a click event to a marker:
mapContext.onMarkerTap((e) => { console.log('Marker clicked:', e.markerId);});In this example, we have added a click event handler that logs the ID of the clicked marker to the console. You can replace the console.log statement with any custom code you want to execute when the marker is clicked.
Moving the Map to a Specific Coordinate
At times, you may want to move the map to a specific coordinate. You can use the `moveTo` method of the map context to achieve this. Here’s an example:
mapContext.moveTo({ latitude: 39.90469, longitude: 116.40717});This method moves the map to the specified latitude and longitude coordinates.
Listening to Map Drag Events
Listening to map drag events can be useful for implementing features like panning or zooming. You can use the `onDrag` event of the map context to listen to drag events. Here’s an example:
mapContext.onDrag((e) => { console.log('Map dragged:', e.latitude, e.longitude);});This method logs the latitude and longitude coordinates of the map when it is being dragged.
Point Clustering
When you have a large number of markers on the map, it can become cluttered and difficult to view.


